Friday, August 28, 2020

Altenew Academy Level 2 Final Project

Hello, hello....so pleased you stopped by! I finished Altenew Academy's Level 2 Classes and wanted to share my final project.  I was challenged to make four masculine cards for four different occasions. I had loads of ideas and had a lot of fun creating.  To make my cards masculine, I used my husband's favorite colors....aqua, blue and green.   Mark probably wears an aqua or blue Columbia fishing shirt five days out of seven...he calls it his uniform!    I also used lots of die-cuts because Mark loves those on cards.   The unifying elements are handcrafted backgrounds and embossed sentiments on navy cardstock.   I've learned so much over the past three months but I decided to spotlight three favorite classes:

  • Beyond Basic Backgrounds - We learned to make beautiful backgrounds to enhance our cards.
  • Celebration Stencil Techniques - We learned to expand our stenciling repertoire. 
  • Masking Unleashed - We learned various masking techniques that up the "wow" factor of our cards.

Encouragement Card:

This first card is my husband's favorite of the group. Mark's beverages of choice are coffee and hot tea....he makes a pot of each every day and  the color yellow is very encouraging and optimistic (In The Mood For Color). My idea was to make inlaid circle die cuts that coordinated with a hand crafted background.  We worked on inlaid die-cutting in Beyond Basic Backgrounds and stencil overlays in Celebration Stencil Techniques.  

  • I started by taping my Altenew Watercolor Stripes stencil to a watercolor paper panel.  I then wet the paper with clean water and then dabbed and pounced three colors of distress ink onto the paper.  I LOVE this technique and think it makes a very fun background.  
  • Next, I took a second watercolor panel and used the wet on wet technique to dab the same three colors of distress ink on the panel.  After the paper dried, I die cut three 1 1/2" circles.
  • I die-cut a white watercolor paper overlay for the inlaid technique.
  • I stamped, Copic colored and die cut three coffee/tea elements from Altenew's Tea Time stamp and die bundle.
  • I heat embossed an encouraging sentiment on navy cardstock.
  • I assembled the card using liquid glue and foam squares (for the cups and sentiment).
PRO TIP:  Don't over-wet the watercolor paper.  If you do, the ink will flow under the stencil and you will lose the white lines.  You do want it watery enough that you achieve a casual watercolor look.

Birthday Card:
This card was inspired by the class on Color Blocking and the negative masking we learned in Masking Unleashed.  I think the bold colors are both festive and masculine.
  • I started by negative masking three 1 1/4" squares.  I then used ink blending brushes to liberally apply ink to the squares.
  • I stamped and die cut three images from Altenew's Garden Grow stamp and die bundle.  I wanted the colors to be the star so I left the images uncolored.  I think this makes for a very eye-catching look.
  • I heat embossed a birthday sentiment on blue card stock and then assembled my card.
PRO TIP:  For a sharp edge, be sure your mask is evenly and securely adhered to the card panel.
Love/Thinking of You Card:
I love ink blending and negative masking so I again drew upon the lessons learned in Masking Unleashed.
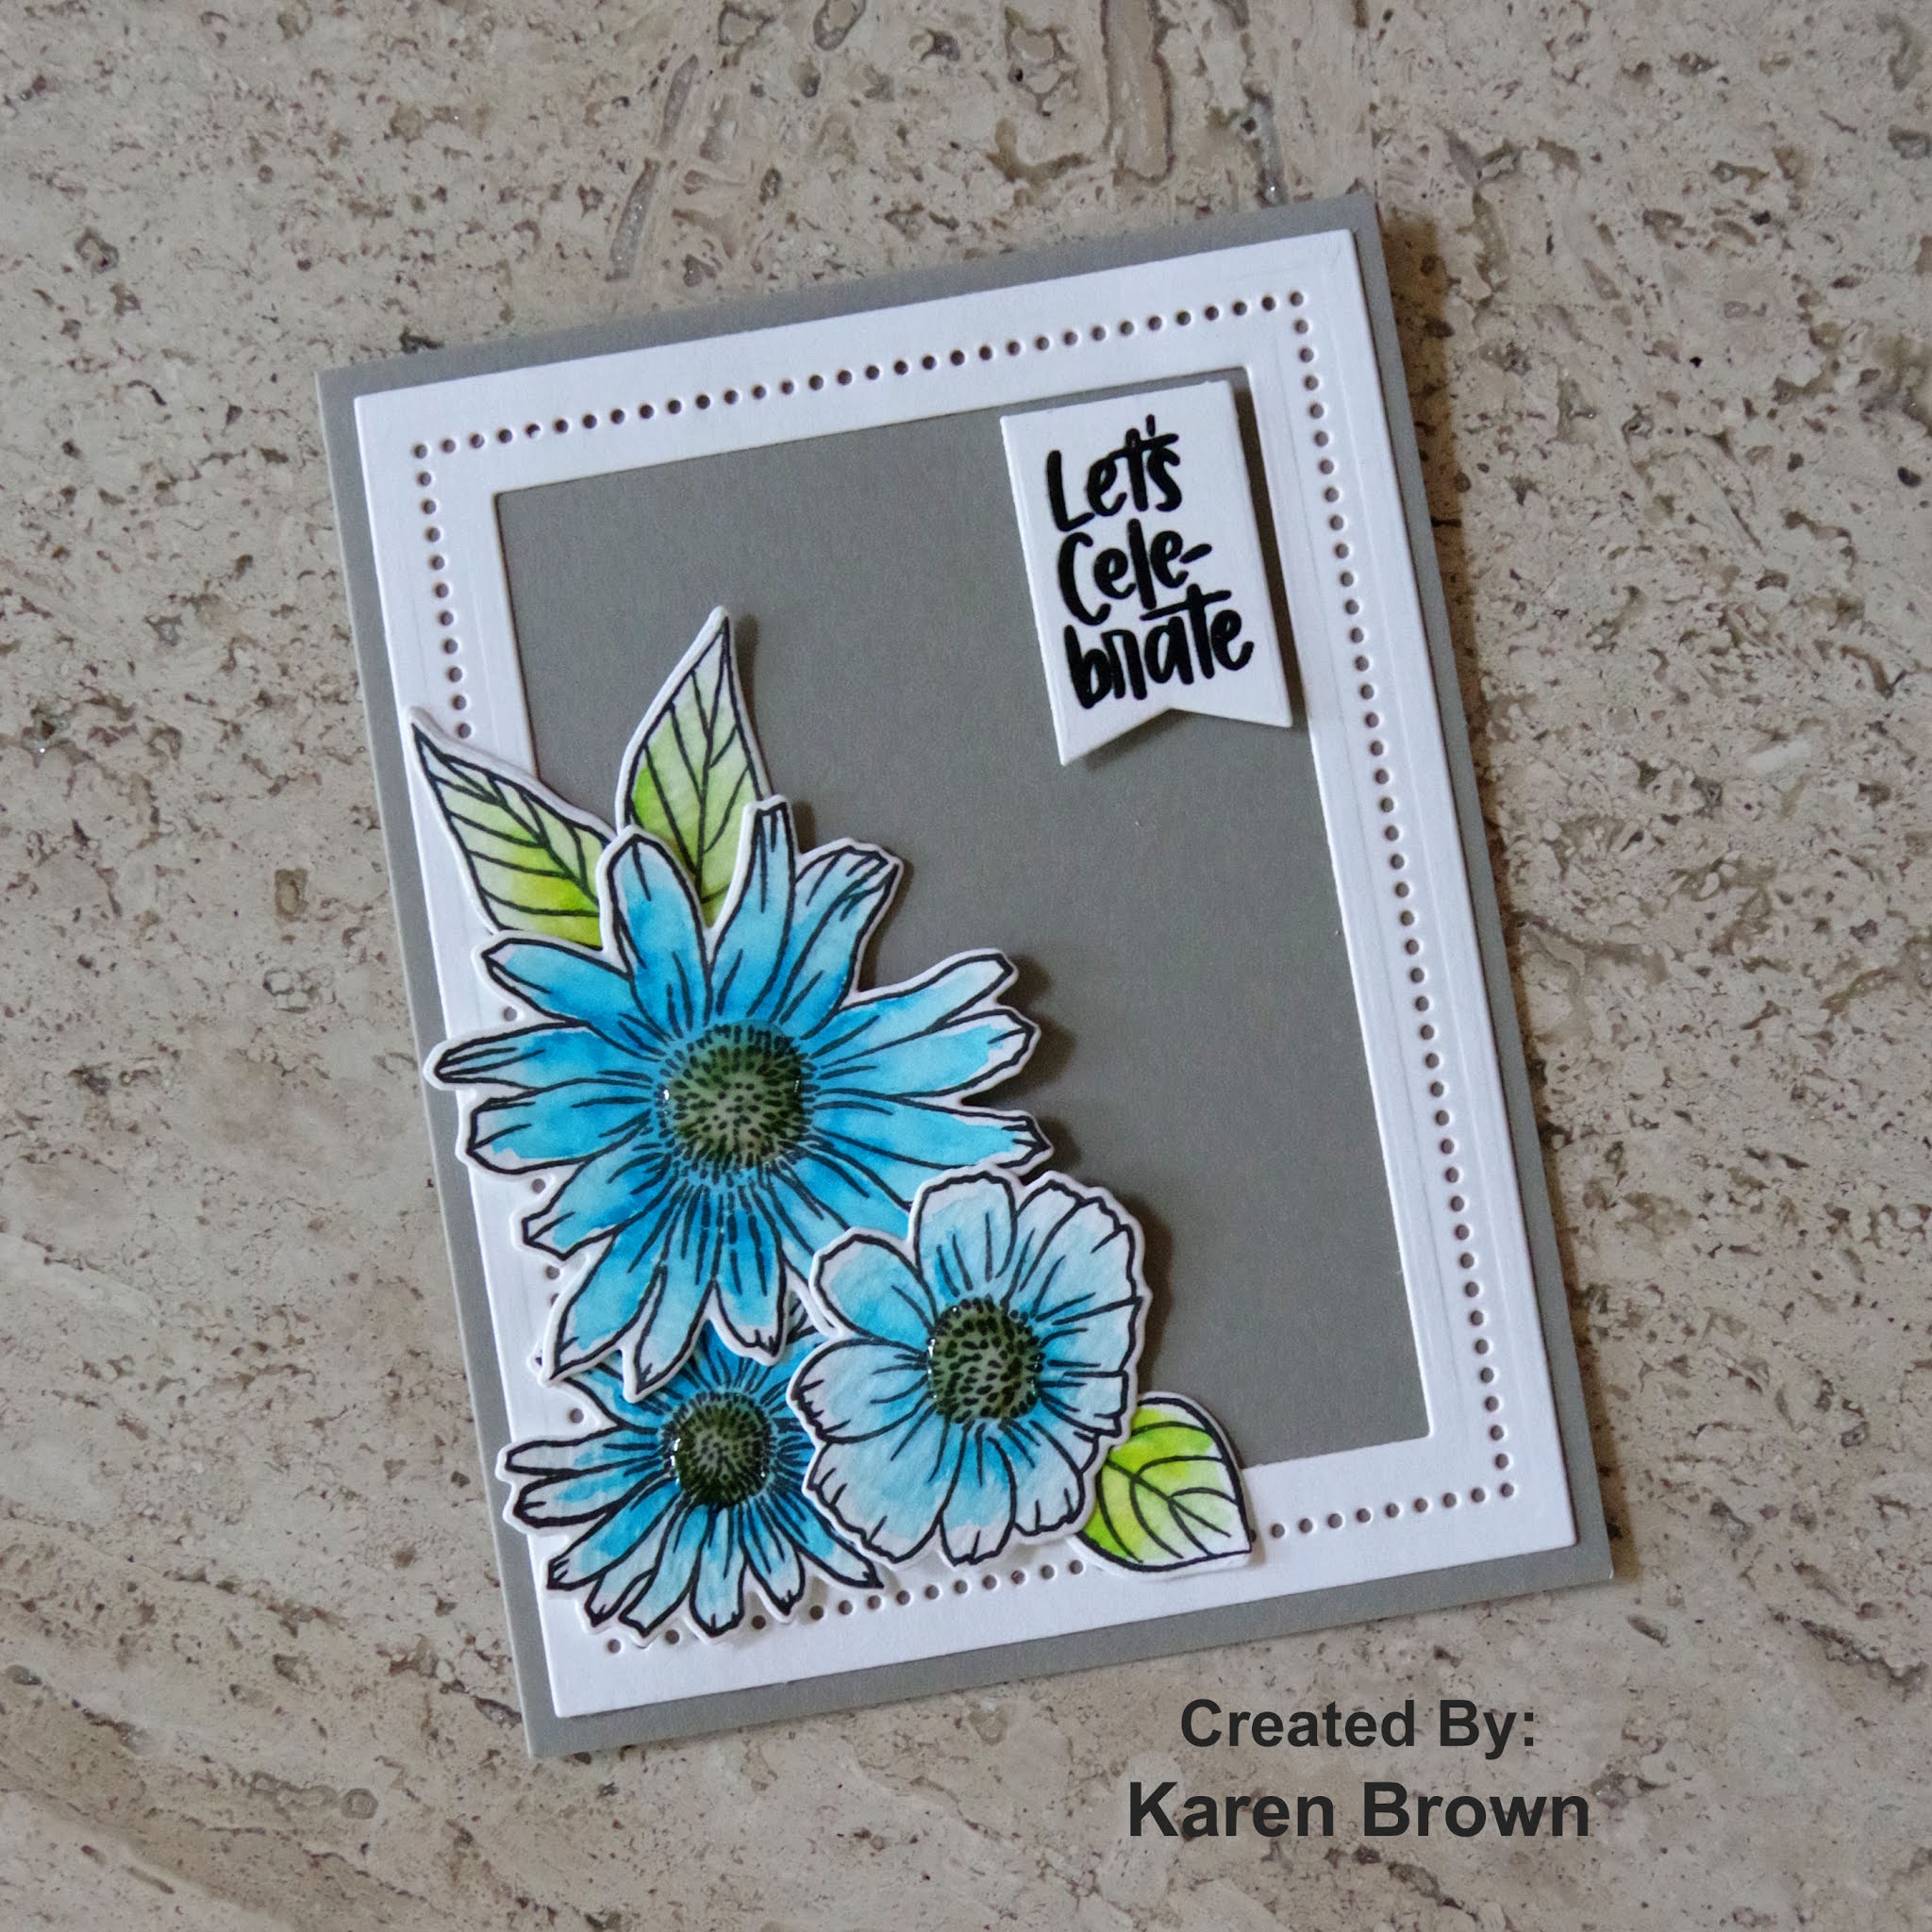
  • I masked off a large negative mask around my card panel.  I blended in a medium blue and then applied a vivid blue around the edges.  So pretty and fun to do!
  • I stamped, Copic colored and die cut two images from Altenew's Garden Grow stamp and die bundle.  This is one of the first stamp sets I purchased and it is still a favorite!
  • I heat embossed my sentiment, assembled my card and attached to a top folding A2 card base.
PRO TIP:  I think using two shades of blue added depth to my one layer card background.  
Anniversary Card:
I knew I wanted to use the wreath from Altenew's Weekend Doodles and I thought it would be beautiful colored in green.  This was the starting point for my card.  After I had stamped, Copic colored and die cut the wreath I thought about backgrounds.  I finally decided to go with another bold color coordinated stenciled background.

  • I Copic colored the wreath with 3 different shades of yellow-green and green.  
  • I started by taping my Altenew Watercolor Stripes stencil to a watercolor paper panel.  I then wet the paper with clean water and then dabbed and pounced four colors of distress ink onto the paper.  I told you above that I love this technique!  
  • I die-cut and assembled the card on a top-folding A2 base.    


Here is a photo of all the cards.  To see what I did with the muslin bag, please keep reading.

Upcycled Item:

Finally, we were asked to upcycle or alter an item. I ordered some muslin favor bags for my daughter's wedding and have quite a few left so I thought this would be the basis for my upcycle project.  I thought they would be cute "envelops" for cards given in person or fun little gift pouches. A lot of the techniques we learned at Altenew Academy can be applied to non-card projects and I would like to share the processes I used to  decorate my muslin bags:

·        Stamping on fabric

·        Coloring on fabric

·        Ink blending on fabric

·        Felt die-cuts adhered to fabric

·        Stamp layering on fabric

I started by personalizing a little bag for each of the cards that I created above. 


For the first two cards, I ironed the bag, secured it in my Misti and stamped just once.  That is all it needed and I was afraid the fabric might shift if I stamped it a second time.  I then did some easy coloring with my Tombow markers.  The fabric colors well but you can’t do much complicated shading.


For the Encouragement Card, I masked three squares and then ink blended white pigment ink inside the squares. I let the ink dry and then I stamped (with black Pigment ink) 3 coffee mugs.  I finished by drawing a black border around each square with a permanent marker.  Simple but graphic looking.

For the Color Block Card, I again masked three squares and then ink blended with the same (distress) inks I used on the cards.  It is interesting that the colors change a bit on fabric, but the result is a bright fun pouch.

PRO TIP:  I inserted a piece of paper inside the bag to prevent the ink and glue from bleeding through to the backside. 

While I was at it, I wanted to do some felt die-cutting.  For my first card I die cut five balloons from felt and glued blue thread to the back.  For the second card I die-cut a Mega Alphabet B and added a sprig of die-cut greenery.


PRO TIP:  To keep the felt from stretching and tearing while die cutting, I first glued a piece of regular paper to the back of the felt.  I let it dry overnight and did my die-cutting the next day.  This makes a huge difference in the quality of the die-cut!

My final idea was to do a bit of stamp layering on fabric.  I used pigment ink, dried with my heat tool and then moved on to the next color.  This card is definitely feminine but I wanted to try the technique on muslin and all my layering stamps are flowers. 

Featured Altenew Products:

Altenew Watercolor Stripes stencil

Altenew Tea Time stamp and die bundle

Altenew Garden Grow stamp and die bundle

Altenew Weekend Doodles stamp and die set

Altenew Bride to Be stamp and die bundle

Altenew Mega Alphabet B die


I really enjoyed putting this project together!
Karen


Wednesday, August 26, 2020

WWC286 - Marsha's Challenge: All About Occasions

Happy Wednesday!  We are creating Occasion cards this week at The Watercooler Wednesday Challenge and Marsha is our hostess.  I did some tone on tone Polychromo coloring on this thank you card.
I stamped the Inked Lotus with blue ink on blue paper and then used blue, green and white colored pencils to shade the image. I die cut and then adhered to a background of designer paper.  Last, I added soft blue, green and clear sequins to finish the project.

Altenew Inked Lotus stamp and die bundle (flower and sentiment)
Thanks for stopping by!
Karen

Wednesday, August 19, 2020

WWC285 - Karen's Challenge: Anything Goes with a Masculine Twist

Hello and welcome!  I am so pleased to be hosting this week's "Masculine Challenge" at the Watercooler Wedenesday Challenge. My husband's birthday is coming up and this is the card I created for him. I was going for a playful summery card.  
My process:
  • I started out by inkblending over a stencil to create the background panel.
  • I then ink blended another small panel for the circle die-cut inserts.  I let both panels dry for a few hours.
  • I die cut the decorative wave border and then three circles from a piece of white card stock.
  • I then die cut three ink-blended circles from the small panel.
  • I stamped, Copic colored  and die cut the animals.
  • I adhered the white panel to the blue background using foam tape. I also used foam tape to add the colored circle inserts for an inlaid look.  I popped on the animals with foam squares and added the sentiment.
My husband loves animal die-cuts so I think he will really like the card. 

Supplies Used:
My Favorite Things Lucky Dog
Simon Says Stamp Stacking Animals
Sugar Pea Designs Element Builder (wave border)
Simon Says Stamp Grid Stencil
Simon Says Stamp Stitched Circle dies
Distress Ink
Bristol Card Stock for ink blending
XPress It Card Stock for the animals
Copic Markers

I am also playing along with:
Inspired By “Critters” Challenge My husband loves critters, dog etc. so that is the theme of my birthday card.


AAA Birthday “Tic Tac Toe” I went with bright (summery colors), embossing (sentiment) and masculine (for my husband).

UPDATE:  I was so pleased to see my card was selected "Top 3"  at The AAA Birthday Challenge. 

I am so pleased that you stopped by!
Karen

Sunday, August 16, 2020

Altenew Academy - Masking Unleashed

Hello!  Well, I am still camping out while work continues on my house, but it left me plenty of time to finish my next Altenew class called Masking Unleashed. I did have to run home to get my inks and blending brushes.  Svitlana Shayevich taught us loads of useful tips and techniques.

 For this card, I chose to work on negative masking.  In the past, I’ve done positive masking where you cover the image you are working on.  With negative masking, you cover the area surrounding an image.  In lesson 4, Svitlana also taught us how to ink blend with  Negative Masking.
 I decided Altenew’s Mega Alphaget “T” die would work well and started planning a thank you card.

My Process:
  • I trimmed a piece of masking paper to 4 1/4” x 5 1/2”,  taped the die in the center and then ran it through my die cutting machine. I then carefully adhered it to a Bristol Cardstock panel.  
  • Next, I lightly blended four shades of Distress Ink from the bottom to the top.
  • I taped the stencil at an angle over the “T” and blended 5 shades over the stencil using a much heavier hand.  I carefully peeled back the masking paper, trimmed the panel down, attached some craft foam to the back and added it to a top folding A2 panel.
  • I die cut a sentiment from navy Cardstock and glued it to the panel.  I also added three enamel dots in coordinating colors.
Pro Tip: Make sure the masking paper is firmly in place before you start ink blending so you have sharp clean lines.  I used a bone folder.
Featured Supplies:
Altenew Mega Alphabet “T” die
Altenew Watercolor Stripes stencil
Altenew Thanks die
Altenew New Day Enamel Dots

Just Add Ink “T” Challenge. My card is T for thanks.


I am so pleased that you stopped by!
Karen

Saturday, August 15, 2020

Altenew Academy - Magical Markers

Hello!  A little update....I haven’t made a card in the past two weeks because we moved out of our house so some renovations could be done. I did pack up a few crafting supplies and had time to finish another Altenew Academy class.  This one was called “Magical Markers” and it was taught by Sara Naumann. Sara had lots of great lessons, but I wanted to show my homework assignment from Lesson One, Metal and Alcohol Markers.  

I had never used alcohol markers on metal, but I LOVED the result.  In lesson one we used markers on Alcohol Ink Foil Tape Sheets.    

My Process:
  • Sara told us to use our alcohol markers and scribble with the broad tip on the foil. Next we spritzed the foil with rubbing alcohol.  Sara used a spray bottle but I used a paint brush dipped in rubbing alcohol.  We waited, turned the panel and spritzed/splattered again.
  • When the panel was dry, I trimmed a 1” strip and die cut some greenery and small circles.  The colored foil is bright and shiny and oh so fun to use on a card!
  • I knew bright yellow daisies would contrast nicely with the shiny green so I stamped and colored three blooms.
I made a top folding A2 card base and stamped a sentiment I thought went well with the foiled accents. The foil is great because you just peel off the backing and the adhesive sticks well to the Cardstock.  I used foam tape for the daisies for a bit of added dimension.

Pro Tips:

  • The foil cuts well with both dies and guillotine style paper trimmers.  
  • The ink color will be lighter and much brighter on the foil than it will be on Cardstock.

I think this photo captures the beautiful shine from the foil.

Altenew Featured Products:  Smile More stamp and die bundle (for flowers and sentiment)

I am so pleased that you stopped by!
Karen


Wednesday, August 12, 2020

WWC284 - Dawn's Challenge: All About Occasions

Hello and Happy Wednesday!  I created a card for my daughter, who is moving into a new home, and thought it would be perfect for this week's Watercooler Wednesday All About Occasions Challenge.  There are so many different cardmaking occasions and we would love to see your card in our gallery.
Supplies Used:
Altenew Garden Grow stamp and die bundle
leftover handstamped scrap
Washi Tape
WPlus9 New Home sentiment
Copic Markers
Foam Tape

I am also playing along with:
Shopping Our Stash KISS. I’ve had this Washi tape for years but this is the first time I’ve incorporated it into a card.  I also used a leftover hand stamped scrap and one of my oldest stamp sets.

UPDATE:  I was so pleased to see my card was recognized as a "Top 3" by Shopping Our Stash!

Thanks for stopping by!
Karen

Thursday, August 6, 2020

Altenew Academy - Impressive Heat Embossing

Hello!  I just completed another course at Altenew Academy called Impressive Heat Embossing.  So many great cardmaking techniques from Svetlana Marchenko!

This card is from lesson #3, Heat Embossing for Resist.
I love to ink-blend so I chose to ink blend over my embossing.  For ink blending it is best to start with light colors and then add the darker tones.  I started with my palest yellow, then added sunshine yellow and finished up with orange highlights.  For the stem I used two shades of green.  I die-cut my "thanks" from aqua paper and I like the big showy sentiment.  I love how bright and cheery this card turned out.
Altenew Supplies:
Altenew Inked Lotus
Altenew Thanks die

I am so pleased that you stopped by!
Karen


Wednesday, August 5, 2020

WWC283 - Tristan's Challenge: Anything Goes with a Feminine Twist

Happy Wednesday! Today we are making "feminine" cards at The Watercooler Wednesday Challenge and Tristan is our hostess.  

I've made a floral birthday card:
I handstamped the background with three different inks and attached a daisy from Altenew's Smile More stamp and die bundle.


Thanks for stopping by!
Karen

Sunday, August 2, 2020

Altenew Academy: Color Your Day

I just finished this card for Altenew Academy's Color Your Day and I wanted to share it.  This is the second class I've taken with Therese Calvird, and she is an excellent instructor!  She is creative, calm and explains her lessons well.

Today's card was inspired by Lesson #1. Therese showed us some loose watercoloring and I loved the color blue she used (Tombow #493).  She also suggested that we leave a little white around the edges and I really like that look.
My process:  I stamped my blooms and leaves on watercolor paper with Versafine Onyx black ink.  I then partially colored the images and then used a wet brush to move the color around.  I was sure to leave a bit of white around the edges.  Therese also suggested using just a hint of neutral for the flowers center, which is really pretty. Normally I would color the centers yellow.  I added some clear glossy accents to the flower centers.  
Supplies:
Altenew Smile More stamp and die bundle
Versafine Onyx Black Ink
Watercolor Paper
Tombow Markers:  493, 443, N45, 173, 133
Nuvo Crystal Glaze
Spellbinders Essential Rectangles for the frame
Foam tape for the three blooms and sentiment
Liquid glue for the other elements.

I also wanted to play along with:

I am so pleased that you stopped by!
Karen

New Blog Site

Hello friends.  I just wanted to let you know that I have a new blog site:  Kennyscards.com I'd love for you to pop over and check it ou...