Sunday, May 31, 2020

Altenew Academy - Let It Shine

I finished Altenew Academy's Let It Shine Class and wanted to share this card on my blog.  As the name suggests, our teacher Clarissa Wiley, taught us to embellish our cards with a bit of shine. I am happy with the way this card turned out....but boy did I put in a lot of work.  I had a different layout created in my mind, but when I laid out the design there was  too much metallic gold.  I kept diecutting flags, banners and sentiments strips. Originally there was a lot more metallic gold cardstock but I decided for me, less is more...a little gold goes a long way!    I will save the other elements I created for future cards and it will be nice to have them all ready to go.
Altenew Academy Let It Shine card featuring gold embossing and gold metallic card stock accent.
My inspiration was to use metallic cardstock (lesson #5), gold embossing (lesson #2) and faux watercoloring over ink blending that I learned in Altenew Academy's Easy Ink Blending Class.  Another example of this fun technique is here.
My Process:
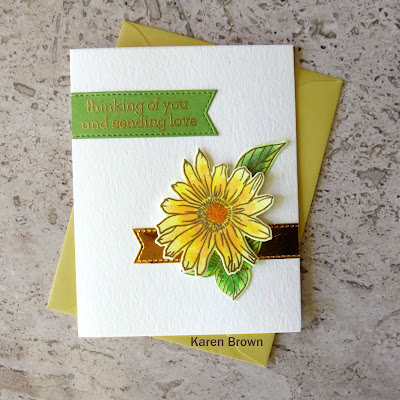
I started by heat embossing this beautiful daisy in gold and then I lightly inkblended a pale yellow over the bloom.  Next I gently sprayed the flower with water and then used a #8 brush and distress inks to paint on some darker yellow highlights using  wet on wet watercoloring.  I dried with a heat gun and then added random orange highlights using wet on dry watercoloring.  I repeated the same technique with the leaves.  I assembled the card using liquid glue and foam adhessive to raise up the flower bloom.
Supplies:
Altenew Smile More stamps and dies
Distress Inks
Watercolor Paper
Picket Fence Studios Life Changing Blending Brush
#8 Paint Brush
Gold Embossing Powder and Versafine Ink
Metallic Gold Cardstock
Scrap of green cardstock for sentiment
Liquid Glue
Foam Adhesive Tape
A2 cream colored card 

As I said above, I tried a lot of  layouts and decided in this instance, CAS was best for me.

I am also playing along at:  

The Sisterhood of Crafters Favorite Technique Challenge.  I recently learned how to faux watercolor and I am having so much fun with this new to me technique!

Global Design Project - Floral Challenge I am happy to add my flower to the GDP challenge.  


I am so pleased that you stopped by!
Karen

Thursday, May 28, 2020

Altenew Academy - Cards For the Guys

Hello and welcome.  Today, my blog post is about making masculine cards and I've chosen to do a color blocking background.  Fun, bright and eye-catching.  
Altenew Academy Cards for the Guys using Color Blocking with Altenew Mega Alphabet T die and Large Thanks Sentiment die.
I started by cutting four 2x2 squares from brightly colored card stock.  My inspiration came from Jennifer Rzasa and her class on Pop Art Color Blocking.  Once the squares were cut, I taped them together, trimmed the edges for a nice even line and then backed with craft foam for dimension.  

Next, I die cut the "T" from bright blue card stock and the "thanks" from lavender cardstock.  I die-cut each three times and then carefully glued them together for nice dimension.   I initially was going to back them with foam but didn't like the white shadow which I thought distracted from all the bright bold colors.  

I made a 4 1/4" x 4 1/4" card base and then attached the color blocked panel.  I weighted it for a few minutes with an acrylic block
Supplies Used:
Altenew Mega Alphabet T die
Altenew Large Thanks sentiment die
6 shades of brightly colored card stock
tape
liquid glue
craft foam
white cardstock for base.

I am also playing along with: Try It On Tuesday "Cut It Out!" Challenge  This card is all about cutting as every element was either cut with a paper trimmer or die cut.  

I really like how the card turned out and think I will do some more color blocking in the near future.

I am so pleased that you stopped by!
Karen

Wednesday, May 27, 2020

WWC273 - Marsha's Challenge: All About Occasions

  Hello and welcome!  Today we are making Occasion cards at The Watercooler Wednesday Challenge and Marsha is our hostess.
I wanted to create a 3D village scene by incorporating a fussy cut "peek-a-boo"window on my card.  I started by stamping two card panels:
  • In the center, a bit toward the top of one panel I stamped the longer street scene (inside the window pane).
  • On a second panel I stamped the "Open" shop on the far left and the cafe on the far right.
  • Next, I Copic colored the scene.  Then I die cut a small circle on the second panel and then used that opening to fussy cut the peek-a-boo window so panel #1 could "peek" through panel #2.
  • I assembled the card using foam tape so the scene would have dimension.
This card is for my sister. Linda loves to travel to Europe so I used their charming villages for my color inspiration.  


Supplies:
Art Impressions:  Shoppes stamp
Neenah cardstock
Copic Markers
The Greetery Crimped Frame Die
foam Tape
Heat Embossed Birthday sentiment

I am also playing along at:

Art Impressions "All Layered Up" Challenge. I used layers to simulate a 3D village scene.

 Inspired By"Sitting Pretty Challenge" I was inspired by those gorgeous colors that remind me of the beautiful European villages.

I am so pleased that you stopped by!
Karen

Monday, May 25, 2020

Altenew Academy - Easy Ink Blending Techniques

Hello and welcome.  I am excited about this new technique I learned at Altenew Academy!  I love ink blending but had never done "faux watercoloring" like this.   This is my homework assignment for lesson #5 and I was very inspired by our instructor, Amy Lee, and the process she walked us through. 
 This card has two firsts for me....ink blending on watercolor paper and faux watercoloring over ink blending.  I personally had never considered ink blending on watercolor paper as it is rough, but it worked beautifully! 

 I started by heat embossing 8 images from Altenew's Smile More stamp set.     I then inkblended yellow, pink, yellow green and blue over the embossing.  Next,  I dabbed 6 colors of dye ink on my glass media mat.  When my palette was ready, I very lightly spritzed the lower inked panel with water.   With a largish brush, I added contrast using very loose watercoloring (wet on wet). I dried the panel with my heat gun and then added more random color variation using the wet on dry technique.  In total, I used 10 different colors of dye ink to complete my watercoloring. Last, I very lightly added some blue paint splatters.  The watercolor paper warped slightly so I flattened it inside a heavy book.

I finished the card by stamping a large sentiment, mounted on a card base using craft foam for dimension and then added five buttercream jewels.  I will definitely use this technique again in the future.  
Supplies:
Altenew Smile More Stamp Set
Watercolor Paper
White Embossing Powder and Heat Gun
Picket Fence Studio Life Changing Brushes
Black Velvet Brushes (#8 for watercoloring and #2 for paint splatters)
Mini Spray Bottle

I made lots of beautiful ink blended backgrounds during this course, but
 this was my favorite card.

I am playing along at As You Like It "Favorite Embellishment" Challenge  I used these buttercream jewels which are my most used embellishment. The color seems to go with everything I create.

UPDATE:  I was so pleased to see my card selected as "Top 3" at the As You Like It Challenge.


Thanks for stopping by!
Karen  

Saturday, May 23, 2020

Altenew Academy - Clean and Simple Boutique Card

Hello and welcome.  Today I am sharing my third card from my Altenew Academy journey.  Jennifer Rzasa taught us about Clean and Simple Boutique cards and I learned a lot.  I chose to write my blogpost about my homework assignment for lesson 2 - Stamped Backgrounds.  I love pattern stamping, but this card pushed me out of my comfort zone because of the loose water coloring.  
My inspiration came from Jennifer when she said don't worry about being precise...keep is casual.  I chose to use Altenew's Garden Grow stamp set, which was the first Altenew purchase I ever made.  It is still one of my favorites.  

My Process:
I started by making an A2 card out of Bristol cardstock.    I found the center of my card, and using an acrylic block, I  stamped the first potted plant in the middle of the card.  Working out from the middle I stamped the rest of the plants.  I then went back and filled in with the rainboots.  Next, I scribbled four colors of Zig watercolor markers on my glass media mat.  The next part was the most challenging for me as Jennifer encouraged us to use a large brush and big strokes to fill in the images.   I used two colors on each image starting with the lighter color and then adding contrast with the darker color. 

 The background is the card and I like how the colors are muted and understated.  

Supply List:
Altenew Garden Grow Stamp Set
Bristol Cardstock
Zig Watercolor Markers (yellow, bright yellow, mid green and olive green)

I would also like to play along with Cardz 4 Galz CASE Your Wardrobe Challenge I have not one, not two but three pairs of olive green pants.  They are all so comfy I keep buying more.  My card has a simple palette of olive green and pale yellow.

Thanks for stopping by!
Karen


Friday, May 22, 2020

Coffee Lover's Wreath

I always love the Coffee Loving Cardmakers Blog Hops and I've made this bright cheery card for their  Spring/Summer Blog Hop.
Sunny Studio Quilted Hearts Embossing Folder
I wanted to do a springy wreath so I went through my stamp sets looking for images that would work for my idea.  
 
I started by dry embossing the background and then I die cut a circle for the sentiment area.  The "quilted" panel was attached to the card base with foam tape so there would be nice dimension. I stamped, Copic colored and die cut a bunch of images and then started working on my layout.  When I had the wreath the way I wanted, I took a picture with my phone so I could glue everything the same way.  

Supplies:
Altenew Tea Time stamps and dies
Avery Elle Festive Wreath stamps and dies
Photoplay Thinking of you stamps and dies
Sunny Studio Quilted Hearts Embossing Folder
Jillibean "Enjoy" sentiment (heat embossed) stamp and die

I am so pleased that you stopped by!  Pop on over to the blog hop and see all the creative cards.

Karen 


Wednesday, May 20, 2020

WWC272 - Helen's Challenge: Anything Goes with a Masculine Twist

Hello and welcome!  This week we are making masculine cards at The Watercooler Wednesday Challenge and Helen is our hostess.  My son-in-law has a May birthday so this card is for Josh.  Josh is a big dog lover and the dog in the middle is his sweet dog Asuna. 
Ink blended background using Catherine Pooler's Blue Suede Shoes.
I started by ink blending a blue background panel which I then put aside to dry.  On a white panel I die cut three windows for my pups and then fussy cut the curved edge.  Next, I stamped, Copic colored and die cut my pups.  Assembly was easy and I used foam tape to attach the white panel to the background and then popped the dogs on.

I saved the die cut circles and used them to make this Encouragement Card.

Supplies:
Mama Elephant Playful Pups stamps and dies
Catherine Pooler "Its a Boy" & "Blue Suede Shoes" ink
Picket Fence Studios Life Changing Brushes
SSS Stitched Circles
Neenah card stock
Copic markers
Black gel pen accents

I am playing along in:
The Paper Players CAS Men in Mind Challenge (#491)

The Paper Girls #200 "All About the Boys" Challenge

Paper Minutes Dog or Cat Challenge #641

I was very pleased to see this card designated "A Cut Above" by The Paper Players!

Thank you for stopping by!
Karen 


Monday, May 18, 2020

Altenew Academy All About Layering 2

Hello, thank you for stopping by.  Today's blog post is showcasing my class project for Altenew Academy's All About Layering 2 class.  I am using Altenew's Bride to Be stamp and die bundle.  The cute little starflowers were my favorite.
I had not used layering stamps prior to starting Altenew Academy so I continued stamping loads of images which resulted in a nice full card.  Our instructor used an acrylic block as opposed to a stamp positioner so I followed her lead and free stamped all my images.  This was great practice for me.  
I love paint splatters on other people's cards but am not usually happy with the result on my cards, so I decided to practice that technique as well.  Because of this, I went very light with the ink splatters.  I think next time I will try a few more.  Lastly, I heat embossed the sentiment for a rich shiny accent.  

I think the end result is a bright, fun and cheerful card. 

I am also playing along with:  The Happy Little Stampers "Anything Goes with Dies"

Karen


Sunday, May 17, 2020

Altenew Academy All About Layering 1

I've been cardmaking for a little over three years and thought it might be time to see what I could learn at The Altenew Academy Teacher Certification Program.    I applied and was pleased to see that I was invited to join their 17th class.  The first class is "All About Layering 1".  I have actually never used layering stamps so this was a great way for me to start.  I purchased their "Bride to Be" stamp and die bundle and started creating.  Since I have never done layer stamping before I thought the best way for me to learn was to just stamp lots of images.
The background, stems and tan flowers were all stamped using Altenew's Coffee Break ink cubes.  For the sentiment, I hand inked a  scrap of paper with navy ink and die cut it twice because I wanted the sentiment to coordinate with the blue flowers.  
I normally stamp with a Misti, but the instructor used an acryllic block so I did also.  I think it was good practice to stamp free hand.  
I practiced on scratch paper to see which colors I liked and wound up with a simple tan and blue palette.  

I am also playing along:
Just Add Ink "Thinking of You" (#505) During these uncertain times, I've found myself making more hello/thinking of you/encouragement cards.  This card is for a friend who is living alone, which is so hard during the quarantine.  

A Place To Start: Create a Custom Background I handstamped my background for this card.  

I was so pleased to see that this card was selected as "The Winner" at Just Add Ink.
I was honored that this card was selected as a "Rising Star" at A Place to Start.
Rising Star Badge

I am so pleased that you stopped by!
Karen

Wednesday, May 13, 2020

WWC271 - Kath's Challenge: All About Occasions

Hello and welcome!  This week we are making occasion cards at Watercooler Wednesday and Kath is our hostess.  My mother-in-law has been in "lock down" at her senior living facility and we have been unable to visit her.  I made this card to try and brighten her day.  
I've always loved cacti and thought this was a cheery little stamp set.  This is my first time to use it.  I also used a new sentiment that I think will be very versatile in the future.  I stamped and Copic colored this foursome.
Supplies:
Fiskars "Stuck on Each Other" stamps
Copic Markers
The Greetery Crimped Frame Die
Waffle Flower "Here For You" sentiment

I am playing along at Krafty Chicks "Stamp Act" Challenge,

I am so pleased that you stopped by!
Karen


Wednesday, May 6, 2020

WWC270 - Tristan's Challenge: Anything Goes with a Feminine Twist

Hello and welcome.  This week is all about "feminine" cards at The Watercooler Wednesday Challenge and Tristan is our hostess.  It seems there is more uncertainty and stress in 2020 so I made a "Hang in There" card to send out during this time of quarantine.
My Monthly Hero May 2019 kit
I had some leftover die cut circles that I thought would be fun to use as small spotlight backgrounds.  I used botanicals from the Hero Arts May 2019 kit and the wreath from WPlus9 New Home.  I stamped, Copic Colored and die cut the images and then mounted on the stitched circles.  I die cut (The Greetery Crimped Frame die) a piece of vivid egg shell blue cardstock and glued onto an A2 card.  
I think this is a cheery and encouraging card that I've already put in the mail to a family member.

I am playing along with the following challenges:

As You Like It - Non-Birthday Occasion During this quarantine I've been making encouragement cards for friends that live alone or seem to be struggling.  The cards have been well received so I have really enjoyed creating and mailing them. 

CAS on Friday - #179 Use Your Favorite Flower Stamp This Hero Arts Kit stamp and die set is one of my all time favorites.  The flowers are so versatile and fun.  


I am so pleased that you stopped by!
Karen


New Blog Site

Hello friends.  I just wanted to let you know that I have a new blog site:  Kennyscards.com I'd love for you to pop over and check it ou...