Showing posts with label Spellbinders. Show all posts

Saturday, July 3, 2021

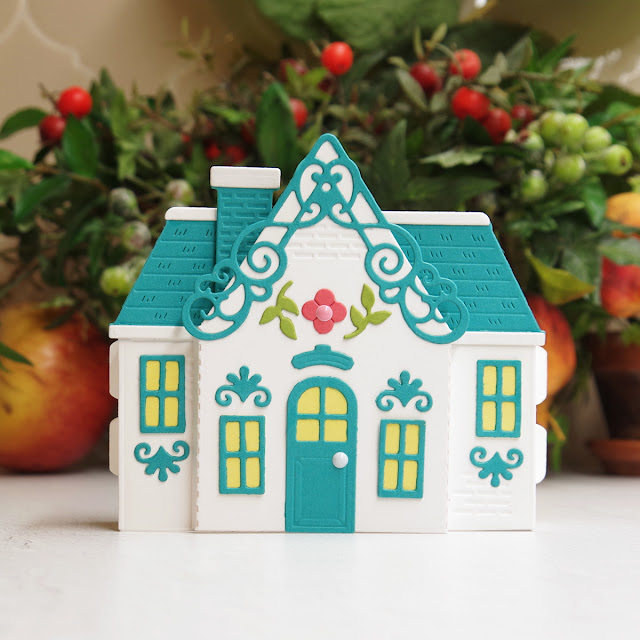
Spellbinders July 2021 Amazing Paper Grace Club Kit of the Month: Home Sweet Home Pop Up 3D Vignette

Hello friends!  I think these are probably the most adorable papercrafting projects that I've ever made!  These little pop-up houses are the July 2021 Amazing Paper Grace Die of the Month and they are just so cute.  You can purchase just this kit,  Home Sweet Home Pop Up 3D Vignette, from Spellbinders. 

Home Sweet Home Pop Up 3D Vignette

 I used Dahlia pink cardstock for my first house and I think it is just scrumptious!  Woudn't this make an adorable wedding card?

  This is my first pop-up card and I will say that the assembly was very straight forward.

Dahlia Pink

I used two enamel dots, one for the door knob and one for the flower center.  


The details are just wonderful.  You can see that there is embossing along the roof peak and also around two of the windows.

  
The house is designed to hold cards inside.  I left this one blank as I am going to hand write a personal note to my friend.  

 
I used Teal Topaz cardstock on my second house and I have to say it has been my favorite color to use this summer.

Teal Topaz

The houses are designed so they can be flattened for mailing, but they pop right back into position when you take them out of the envelop.


I am so pleased that you stopped by to see these fun houses!

Karen

Thursday, July 1, 2021

Spellbinders Beautiful Sentiment Vignettes Die Cut Cards

Hi there, Karen Brown here and I am so excited to be on The Spellbinders Blog today!  I have three projects from The Beautiful Sentiment Vignettes Collection by Becca Feeken.  This is a lovely set and each card makes such an elegant statement.  The projects would be so pretty in gold and white, but I went a bit more bold with black and teal frames and then mixed in colorful floral die cuts. 


BIRTHDAY WISHES VIGNETTE
I used the Birthday Wishes Vignette Etched Dies on this first card and I went with fun summery colors.   I die cut the frame twice using Teal Topaz cardstock.  I then  stacked the die-cuts and glued them together to add a bit more dimension.  

Topaz Teal

Using Petite Floral Potpourri Etched Dies, I die cut a bunch of flowers and leaves in a variety of colors from Spellbinder's Assorted Cardstock Pack and then started trying different layouts. 


    I layered different sizes and types of petals and like the effect.  I love that there are so many beautiful combinations.  To finish the card, I added some small crystal gems to the flower centers. 

I used an A7 card base that I made out of white cardstock.   This is a big showy card and I can’t wait to send it!

ROMANTIC CHARGEOUR VIGNETTE
Waterfall aquaa cardstock
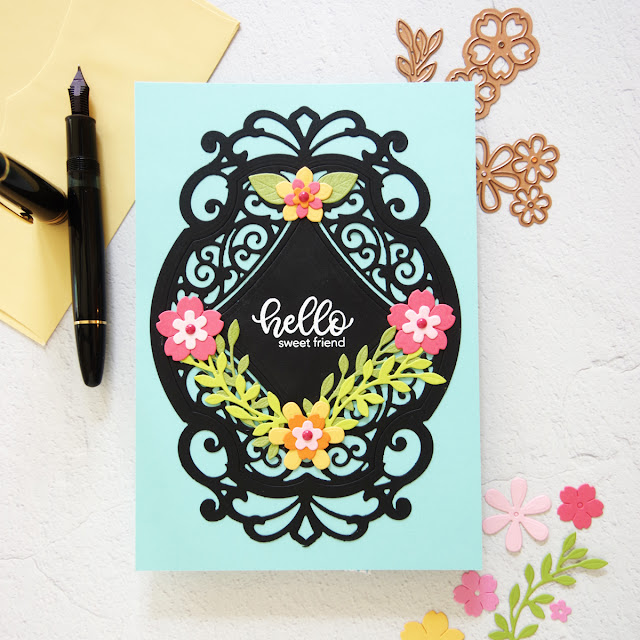
I went for a dramatic look on my second card.  This Romantic Changeour Die has such lovely detail and I think the black frame over the Waterfall cardstock is very striking.  The card base is 5 x 7”. 

The Petite Flower Potpourri flowers and greenery are the perfect accents for the frames.  I added some enamel dots to the flower centers for additional interest and dimension.  I love the sentiment from Sugar Coated Sentiments.

BLESS YOUR HEART STAINED GLASS INLAY DIECUTTING

Blue, Pink and Yellow stained glass inlay die cutting

As soon as I saw the Bless Your Heart Vignette, I knew I wanted to do some inlaid die cutting.  I was going for a stained glass effect.

I die cut the frame in black and then again in Raindrop blue, Haystack yellow and Dahlia pink.  I used the outer frame to die-cut my white base  so I could inset the black frame for my inlay.  Next, I inlaid the pink heart, blues and yellow.  Initially, I had more yellow in my design, but decided I wanted more of the serene blue so I ended up using just six accent pieces of yellow for a bit of contrast.  

I am so pleased you stopped by!   If you have another moment, I would love to hear which is your favorite card. Happy crafting!

Karen


Sunday, April 25, 2021

Spellbinder's Stained Glass Bouquet

Hello!  I've been playing with  Spellbinders new Stained Glass dies and found them to be really fun to create with!    I have two cards to share with you today and I think they are both so happy and  cheerful.

Faux Stained Glass Inlay Technique for papercraftersInlay Stained Glass Die Cutting

I started by ink blending three panels for my stained glass in-lay: 

  • a coral gradient of soft pink, hot pink and orange
  • two greens
  • aqua blue
I let the panels dry and then began die-cutting. 
  • I used the square die to cut a 4 1/4" square while at the same time using the circle die to cut an opening in the center.  I stamped my sentiment near the bottom.
  • Using a tape runner, I adhered craft foam to the back of the square panel with the circle cut.
  • I folded a fabric softener sheet into fourths and then placed on top of the circle die cut so the small pieces would not stick to the die.
  • I then die cut the circle from black and then again from the three ink blended panels.  
  • I carefully put the black frame in the circle and then added the aqua, pink and green inlay pieces.  The tape runner adhessive was there to secure all the inlay pieces. 
  • I made a 4 3/4" x 4 3/4" square card and then attached my stain glass panel.  
I like that the pink/coral gradient gives subtly different tulip colors.


Supplies:
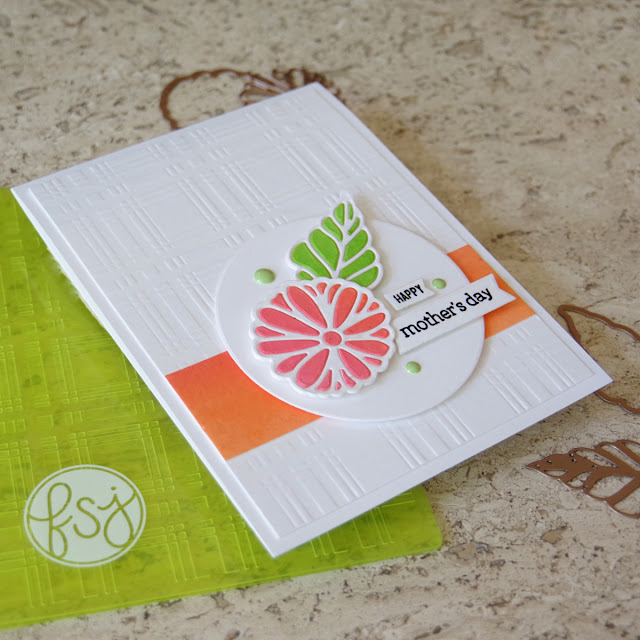
I decided to make a second card using the remaining inkblended panels from card #1.  
Papercraft Floral Inlay Diecutting Technique

  • I die cut the flower and leaf skeleton in white and then cut each base from white.  I glued the skeleton to the base with a tape runner again.  
  • I then cut the flower from the coral panel and the leaves from the green panel.  With the colored pieces still in the die, I flipped the die over and guided the pieces into the corresponding cavities.  This actually works really well for the small pieces.  
  • I dry embossed the plaid background.
  • The accent strip was cut from the coral ink blended panel and then glued to the embossed panel.
  • I used the circle die from the first kit for a spotlight circle and then attached the elements with foam tape.Supplies:
  • Spellbinders Be Leave Me Stained Glass Bouquet Dies
  • Spellbinders Plaid Embossing Folder
  • Spellbinders Tulip Trio Stained Glass Bouquest Etched Dies (diecut circle spotlight)
  • Hand Inked Panels for Inlay
  • Craft Foam
  • Tape Runner
  • Enamel Dots
I love the clean bright white and warm summery colors on this card.  I would love to hear which card you like best.

Karen


Sunday, April 18, 2021

Spellbinder's Sweet Street By Tina Smith Layer Cake Surprise Birthday Cards

 Hello!  I just received my Sweet Street order from Spellbinders  and had so much fun creating yummy birthday cards!  The dies emboss and cut so there is loads of texture on each card.   I made four cards with two different background colors....white and navy.   I also used my favorite border die, Spellbinder's Essential Rectangle Dies, on all four cards.

The first two cards are really fun as they are interactive....pull the candle and the layers telescope out. This first card I assembled with foam tape for added dimension.

 Don't you just love that cute little "Make a Wish" tag? The tag is part of the layer cake die set and the companion sentiments fit perfectly on the tag.  The navy interactive card was assembled with liquid glue, the other three were assembled with foam tape.

I made a second set of quick and easy cards that are not interactive.  I die cut just the base cake and frosting and assembled with foam tape for dimension.   I don't think you can ever have too many birthday sentiments, and this set is full of yummy word stamps.

This card was my husband's favorite because he always chooses chocolate cake!

I love the navy background with the pastel cake.

Supplies Used:

Spellbinder's Layer Cake Surprise Dies

Spellbinder's Sugar Coated Sentiments

Spellbinder's Essential Rectangle Dies

Spellbinder's Month 7 Die of The Month - Embellishment on Icing (older discontinued die)


I would love to hear which card is your favorite.

Karen


Wednesday, September 16, 2020

WWC289 - Heidi's Challenge: Anything Goes With a Masculine Twist

Hello, hello...so glad you stopped  by!  This week is all about masculine cards at Watercooler Wednesday and Heidi is our hostess.

I created a silhouette card with a darling die-cut puppy and cake toting bear.  My background is a second generation wash using three colors of distress ink:  Twisted citron, cracked pistachio and lucky clover.  I made a background for a different card and still had ink left over, so I sopped it up on a Bristol panel.  I thought the greens did a good job of simulating the forest.

Supplies Used:
Spellbinder's Lets All Party die
Memory Box Grand Forest Archway
SSS Birthday Word Mix 1 sentiment

We would love to see your card in our gallery this week!
Karen


Wednesday, November 20, 2019

WWC248 - Kath's Masculine "Anything Goes" Challenge

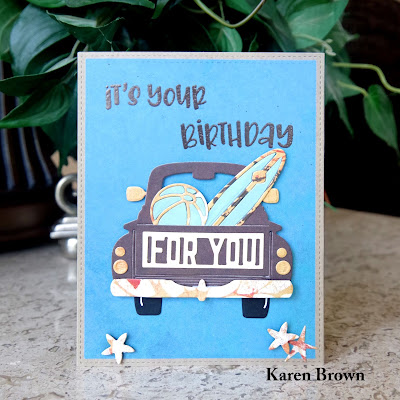
Hello and welcome!  This week at The Watercooler Wednesday Challenge we are designing projects for the men in our lives.  Kath is our hostess.  I created a card for my brother who drives a pickup and is an avid surfer.  I love how this die set has beach accessories to fill the truck bed.
Nuvo Tonic Hot Chocolate embossing powder

I used Spellbinder's Truckin' Through the Seasons die and Nuvo Tonic Hot Chocolate Embossing powder for the sentiment (Ranger Letter It). The card stock is Bohemia Blue Bird and Barefoot Beautiful "All Boy".  

Can't wait to pop this card in the mail to sunny California.

I am entering this card in: 

The Male Room "Hobbies" Challenge I made this card for my brother who is an avid surfer.  

Lil Red Wagon Birthday Challenge

Happy Little Stampers Anything Goes With Dies Challenge


Thank you for stopping by!
Karen


Image may contain: text

Wednesday, March 20, 2019

WWC213 - Karen's Masculine "Anything Goes" Challenge

What a day....it is my turn to host Watercooler Wednesday's Anything Goes Masculine Challenge!  I am very excited.  :-)

Image may contain: one or more people and text

I recently purchased a die cutting machine (Gemini Junior) and ordered this fun die cutting set from Spellbinders.  This card is for my new son-in-law.  He drives a pick-up truck, so I thought this would be perfect for him.

I started by die cutting a kraft card base (Sugar Pea Design Builder).  I used Nuvo Hot Cholcolate embossing powder for the sentiment (Ranger Letter It Birthday).  Next, I cut out all the truck pieces using Bohemia Blue Bird "All Boy" card stock (coordinating double sided paper).   I enjoyed the die cutting and paper selection.  I wanted dimension so I used foam tape for the truck body and then an additional layer of foam tape for the license plate and bumper.  I tucked in a few gifts die cut from scrap paper I had left over.  The ribbons on two of the packages are light green but they did not photograph well.

Spellbinders October 2018 Large Die Kit


Masculine card featuring a blue truck.

I am entering this card in:
Cardz 4 Guyz "To Die for Challenge"  I lost track of how many dies I used on this card, but I think my son-in-law will really like the card.
Cardz 4 Guyz Logo
 Happy Little Stampers "Die" Challenge  I've never made a card with so many dies before, it was kind of like doing a fun puzzle.


The Male Room "Do It Yourself Challenge"  This card is for my son-in-law. He drives a pickup and for Christmas he asked for tools so he could do maintenance and repairs himself.  So we got him a variety of DIY tools.


Brown Sugar Transportation Challenge - A pick-up is my husband's primary mode of transportation.

Simon Says Stamp Wednesday Challenge  I think this little pick-up is as "cute" as can be!


Thanks for stopping by!  I truly hope to see your masculine creation on the Watercooler Website.

Karen

New Blog Site

Hello friends.  I just wanted to let you know that I have a new blog site:  Kennyscards.com I'd love for you to pop over and check it ou...